
(The most up-to-date version of this documentation is bundled with the Picardy software, and is available by clicking Help > Help File.)
Welcome to Picardy 2.1!
Picardy is free-of-charge, freely-distributable software for editing and formatting back-of-the-book indexes.
“Picardy” stands for “Index CARDs in PYthon, which is the programming
language that the software was developed in. (Also a region in France.)
- Overview
- Creating an index
- Editing tools
- Highlights and marks
- Groups
- Find and replace
- Abbreviations
- Realphabetizations
- Function words
- Spell-checking
- Inserting and deleting pages
- Clipboard functions
- Styles
- Sorting the edit pane
- Backups
- Picardy settings
- Appendix A: Converting a PDF index to Picardy format
- Index
Overview
What this software isn’t: it doesn’t ingest the text of a book or document and output an index. You’ll have to take your chances with ChatGPT™ or Bing™ for that.
What it is: it enables you, the indexer, while reading through a text (it may be your own work or someone else’s) to note down indexable terms, names, and concepts, along with the relevant page numbers, or perhaps cross-references, in a simple plain text notation. Then it will alphabetize, collate, and format the index so that it can be incorporated into the published text.
For example, the index of a book on wildlife could contain entries such as the following:
bears, 25
grizzly, 33
koala, 39
Kodiak, 56
koalas, 92 (see also under bears)
Kodiak bears (see under bears)
pandas, 67 (see also bears)
ursines (see bears)
Each of these can, respectively, be expressed in Picardy’s notation:
bears#25
bears>grizzly#33
bears>koala#39
bears>Kodiak#56
koalas#92
koalas<<bears
Kodiak<bears
pandas#67
pandas+bears
ursines=bears
As you can see, the ‘#’ character separates the headings in the index entries from the page numbers. Similarly, ‘=’ indicates “see’, ‘+’ means “see also”, and so forth. If there is more than one level of heading, the headings are separated by the greater-than (‘>’) character.
Users who find this way of entering data natural can write an entire index just using plain text. For users who prefer a more graphical environment, Picardy also provides editing dialogsand other editing tools.
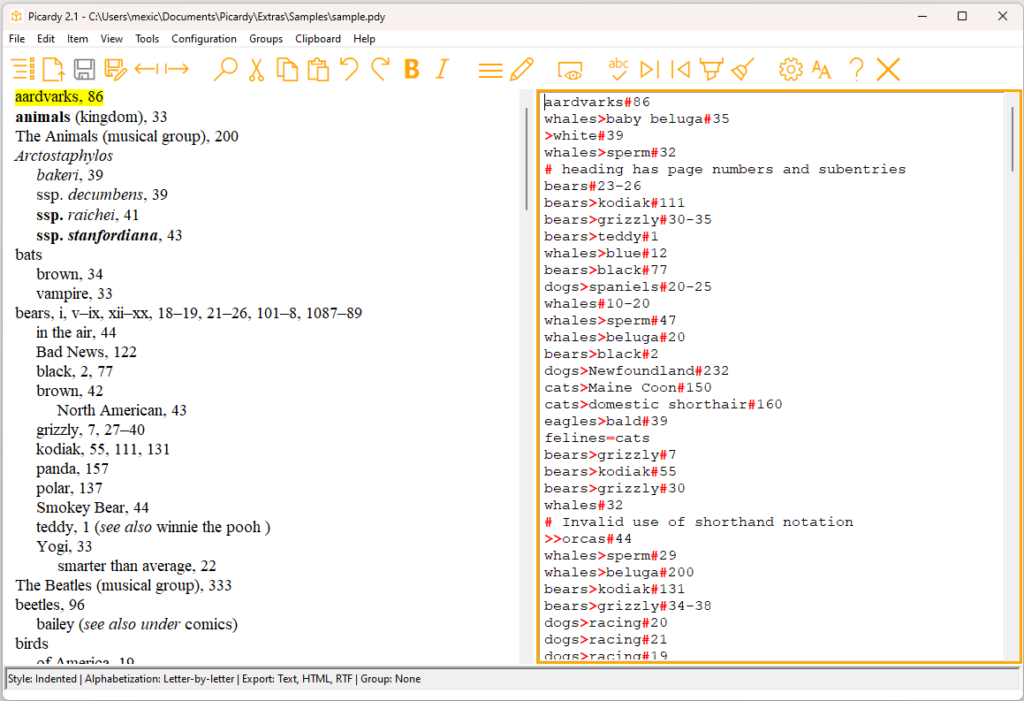
The edit pane
The Picardy window consists of two panes. The edit pane on the right is for entering raw plain text input, which will be referred to as index “items.” The format for these items, such as those in the examples you just saw, is described in detail below.
Note: You can resize the panes horizontally by hovering the mouse
over the space between the panes until the pointer turns into a double-headed arrow, then dragging the mouse left or right as desired.
You can type directly in the edit pane or click the (Ctrl+K)
and (Ctrl+E) buttons to enter content via dialogs.
When you click an item in the edit pane, the line will be highlighted (by default in light green, but you can configure this via the Styles dialog). There
are different kinds of highlighting that may appear in the edit pane, such as syntax-checking feedback, highlighted items corresponding to the current entry in the preview pane, and user-defined highlights. All of these may be shown at the same time as the ‘current item’ highlight.
The edit pane will have an orange border when it has focus. Most commands in the Edit menu and all commands in the Clipboard are available only in the edit pane; some commands are available via their keyboard shortcuts in the New/Edit Item dialog.
Note: Because many edits consist of a deletion plus an insertion of text, sometimes you will need to click Undo (Ctrl+V) twice to reverse changes.
The edit pane has Notepad-like capabilities, but Picardy also provides a set of tools to enhance editing.
- If you click an item in the edit pane the preview pane will
jump to the location of that item. (You can turn off this behavior and carry out jumps manually by pressing and Ctrl+Left arrow.) - Tools > Character Map facilitates entering characters in various languages and scripts. This dialog copies the selected character to the clipboard; you can then paste it into the edit pane or a dialog box field, as needed.
You can also enter “special” characters or symbols by typing the four-digit hexadecimal code in the edit pane and then pressing Alt+X, or by pressing Alt followed by ‘+’ and the four-digit decimal code in the numeric keypad. Alt+X also works in the dialogs for defining realphabetizations, abbreviations, function words, and dictionary entries.
Characters copied from the Windows Character Map
will adopt the current font used in the edit pane. - You can find and replace () in the edit pane and find content in the preview pane.
- Input can be validated (Tools > Validate Index) to detect “syntax”,
consistency, and style errors. - You can set some styles (Configuration > Styles) of the two panes such as font and font size, and display the separators (>, <, #, =, +) in the edit pane in a different color to make them stand out from the headings and page numbers.
- Item > Select Item (Ctrl+Shift+A) will select the current item (line) in the edit pane; Item > Delete Item (Ctrl+Shift+D) will delete it.
To print the contents of the edit pane (in order to proofread it, for example), click File > Print Edit Pane, or the same command in the edit pane’s right-click popup menu.
The preview pane
The preview pane on the left shows a formatted, sorted, and collated version of the index. Since final formatting of indexes is generally carried out by the client publisher, the preview cannot show exactly what the finished index looks like, but it can give an approximation of its form and structure. Click or press Ctrl+P to refresh the preview. The preview will refresh automatically if you press
Enter, delete an item (Item > Delete Item), edit or create an item, or delete a line.
By default, when you click in the preview pane, the corresponding items in the edit pane will be highlighted. You can turn off this behavior if you want; in that case press Ctrl+Right arrow or click View in edit pane in the pop-up menu to
highlight items in the edit pane. You can cycle through the results using (Next Mark or F3) and (Previous Mark or F4).
To edit an item from the preview pane, hover over it and press Ctrl+Shift+E (or click Edit in the popup menu). This will display the Edit Item dialog. One line in the preview pane may correspond to several entries in the edit pane; any changes you make will be condensed to a single item in the edit pane.
You can preview the index in page number order by clicking View > Preview by Page Number(Ctrl+Shift+P).
You can view the contents of the preview pane in a browser by right-clicking and then clicking View in Browser in the menu. This enables you to print the formatted index.
If you want the preview pane to update continually as you type in the edit pane, go to Configuration > Settings > Misc and turn on this feature.
Page numbers
Four types of page numbers are supported and can be configured via the Settings > Pages dialog:
- Single-part numbers or ranges consisting of numeric digits (1, 2-5, etc.)
- Single-part numbers or ranges consisting of lowercase roman numerals (i, ii-v, etc.)
- Two-part numbers or ranges where the section number can be a
numeric digit or uppercase letter, and the section and page numbers separated by a character
of your choice (1-7, B-6, 2.3-2.9, etc.) - Two-part numbers or ranges where the section number can be a
uppercase letter, and there is no separator between the section and page numbers (A7, B6, C3-C9, etc.)
Single-part roman and numeric, and two-part numbers can also be followed by annotations.
Single- and two-part numbers can’t be used in the same index, but you can use roman numbers in combination with either.
See also the section on editing tools for more information about working in the edit pane.
Links as locators
Instead of page numbers, you can use hyperlinks (URLs) as locators (a more generic term for the “destination” part of an index item). You can display links in an index the same way as page numbers are displayed, after the headings, or as bullet characters. Alternatively, you can treat the headings as hypertext with the specified links as their targets (in HTML terms, the HREFs).
In both cases, you enter the links in the edit pane just as you would page numbers;
CBC#https://cbc.ca, https://ici.radio-canada.ca/
NPR#https://www.npr.org
For hypertext headings, you should enter only one link per heading.
Saving and exporting your work
Click (File > Save) to save the raw input. It will be saved as a text file with a .pdy file extension by default. Click (File > Export… or Ctrl+R) to save the
formatted index in one or more file formats. The available formats are HTML, RTF (styled and unstyled), plain text, Cindex™ IXML, SKY Index™ 8.0 (.txtsky8), and EPUB. These are the formats in which the finished index may be submitted to your client or publisher. Choose the export formats you need via Configuration > Settings > Export.
Configuration
Click (Configuration > Settings) to configure how the index will be formatted: indented or run-in, letter-by-letter or word-by-word alphabetization, reference format, and so forth. You can also select the export formats.
The configurations are saved in several files in the folder indexname_configs,
located in the same folder as the index input file.
Templates
You can save the configurations for the current index and later use them for another index. Click Configuration > Save as Template to select a name and location for the template. This creates a .pdyt file.
Click File > New From Template to create a new file that
uses the selected template. You will be prompted to save the new index during this procedure. To apply a template to an existing index, click Configuration > Apply Template.
Indexing best practices
While Picardy will help you produce a superior index by checking spelling, style, and syntax, no software can ensure that you follow the norms and conventions developed by experienced indexers. If you are new to indexing, we recommend that you consult a reference such as the American Society for Indexing’s
Best Practices for Indexing.
Importing from other applications
If you have an existing index in Cindex™ IXML format or SKY Index™ 8.0 (.txtsky8) you can import it into Picardy using File > Import or by clicking .
You can also import a plain-text index exported from Picardy or created by another application, provided it follows specific conventions: the index must be indented; indent level must be indicated by tabs; headings must be
followed by commas; references must be formatted in one of the formats exported by Picardy.
Imported files should always be carefully proofed.
If you have a text index that isn’t in one of the above formats, you can copy and paste its contents into the edit pane and use Picardy’s editing tools to manually convert it to Picardy’s syntax. Similarly, you can edit it in your favorite text editor (for example, Notepad++) to do the conversion and then paste the results into Picardy.
Please see also Appendix A for detailed instructions on converting a PDF index into Picardy format.
Merging indexes
If you have a second Picardy index that you would like to merge with the current index, click File > Merge. This enables you to select an index file that will be appended to the current index.
Creating an index
The input for Picardy consists of a plain text file. You can get an idea of what the raw index input file looks like by opening Picardy Files/Samples/sample.pdy
in your Documents folder. (This sample isn’t meant as an example of proper indexing practice, but rather to showcase features, including error detection. See the
best practices section above if you need indexing advice.)
Creating and editing items
The New Item () and Edit Item () dialogs are an alternative to the
text-based notation described below.
An item is just a single line of input, whether you enter it directly in the edit pane or via one of these dialogs. An item will consist of one or more index headings, followed by one or more page numbers or
a reference to another part of the index.
Note: Indexers normally define an index “entry” as consisting of all the information contained under a single main heading (some call this an “array”). One or more Picardy items may make up an entry, depending on whether
there are multiple page numbers, subheadings, and references.
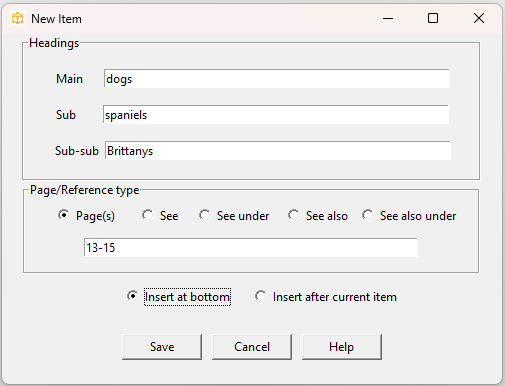
In the Headings section you can enter the index headings. You can enter up to three levels of headings: a main heading,
a sub-heading, and a sub-sub-heading. The image above shows
a three-level index item. In the formatted index it would look something like this:
dogs
spaniels
Brittanys, 13–15
In the Pages/Reference section you enter the page numbers, or alternatively,
a reference to another index entry. Click Page(s) (the default) if you want to enter one or more page numbers or page ranges.
There are four types of references:
- See references: used in cases where the index term you’re referring to is a synonym or near-synonym of the current entry, and the current entry doesn’t have any page numbers or subheadings of its own. For example: “canines (see dogs)”
- See also: used when the current entry has page numbers or subheadings of its own, but there is some related information in another entry. For example: “teddy bears, 50–55 (see also bears)”
- See under: used when the current entry is handled elsewhere in the index as a subheading of another entry and has no pages or subheadings of its own. For example: “grizzly bears (see under bears)”
- See also under: used when the current entry has page numbers or subheadings of its own, but there is some related information in a subheading of another entry. For example: “teddy bears, 50–55 (see also under bears)”
New items can be inserted after the current cursor location or at the bottom of the pane.
When saving an existing item, you have the option of propagating changes.
This will apply your changes to similar existing items. The rule is that changes will be applied to items that match all of the headings in the item you’re currently editing. For example, you may have the following entries:
bears#25
bears>grizzly#27
bears>black#34
bears>grizzly#45
bears>grizzly>Alaskan#51
If you change bears#25 to bruins#25, this will apply to all items, since they all have bears as the main heading. If you change bears>grizzly#27 tobears>brown#27 this will apply to the three items that have bears as the main heading and grizzly as the first subheading. A change to bears>black#34 will not update any other items, since it is the only one with bears as the main heading and black as the first subheading.
When you save a new item, the dialog stays active and retains the page number to facilitate adding more items from the same page in the source text. If you have enough screen space you can move the New Item dialog off to one side of the main window to keep it visible as you work. (The Edit Item dialog also stays visible when you save. If you click elsewhere in the edit pane the dialog will refresh to reflect the current item.)
Most Picardy dialogs, if hidden by the main window, can be moved to the front by clicking or pressing the same toolbar button, menu command, or keyboard shortcut that initially displayed them. You can also use the standard Windows Alt+Tab shortcut to front a dialog. New Item and Edit Item will remain on top of the main window (unless you move them). Only one of New Item and Edit Item can be active at any time.
Tip: Pressing the End key in this dialog will move the cursor directly to the Page/Reference entry field. In this and other dialogs: pressing the Enter key will perform the default action (in this case, Save); pressing the space bar does the same as pressing the highlighted button (if there is one); Tab and Shift+Tab will cycle forward and backward between fields; and Esc will close the dialog without saving (except when an autocomplete suggestion is showing).
Picardy commands are not available in the New/Edit Item dialog via the various menus. Some commands are available by pressing the appropriate keyboard shortcut, as shown below:
| Command | Shortcut |
|---|---|
| Edit > Cut | Ctrl+X |
| Edit > Copy | Ctrl+C |
| Edit > Paste | Ctrl+V |
| Edit > Smart Paste | Ctrl+Shift+V |
| Edit > Bold | Ctrl+B |
| Edit > Italic | Ctrl+I |
| Edit > Small Caps | Ctrl+M |
| Edit > Ignore in Sort | Ctrl+G |
| Edit > Use in Sort | Ctrl+H |
| Item > Flip Headings | Ctrl+1 |
| Item > Collapse | Ctrl+5 |
| Item > Join | Ctrl+8 |
| Clipboard > Invert Name | Ctrl+F1 |
| Clipboard > Invert Name and Initialize | Ctrl+F2 |
| Clipboard > Invert Name and Initialize (no dots) | Ctrl+F3 |
| Clipboard > Pluralize | Ctrl+F6 |
| Clipboard > Paste Right-to-left name | Ctrl+F7 |
| Clipboard > Paste Right-to-left | Ctrl+F8 |
| Clipboard > Double Quotes | Ctrl+” |
| Clipboard > Single Quotes | Ctrl+’ |
| Clipboard > Italicize | Ctrl+Shift+I |
| Clipboard > Embolden | Ctrl+Shift+B |
| Insert hexadecimal nnnn character | nnnn+Alt+X |
Click Help > Commands to view a full list of Picardy commands and shortcuts.
Working in the edit pane
This section describes the plain text notation for entering items. It’s up to
you whether you use this format or the editing dialogs described above.
To create a main heading for “bears” referring to page 25:
bears#25
The heading is separated from the page number by the ‘#’ symbol.
Note: In the edit pane, pressing the ‘;’ (semi-colon)
key will insert a ‘#’ character. To insert a semi-colon, press ‘Ctrl+;’.</p
You can specify more than one page number, or a range, separated by commas:
bears#25,27,30-35
You can use lowercase roman numerals:
bears#ii,xv-xix
You don’t have to put all of the page numbers for a heading on the same line:
bears#25
...
bears#27,30-25
...
bears#100-102,107
You don’t have to put all the lines with the same headings together in the input, and the numbers don’t have to be in increasing order:
bears#25
bulls#26
swans#27
bears#30
bears#iv
swans#19
bulls#6
You can enter the page ranges in any order:
bears#107,100-102,25
Annotations
Page numbers and ranges can have annotations such as n, n2, ff., passim, etc.
bears#xxvn19,27n1,32fig,77ff.,110-130_n_2
rabbits#1:7-1:12n3
Annotations can have spaces:
ocelots#82 and n
Annotations can be formatted:
gnus#55_and n_
The special annotation tbd (in any case combination) can be used to designate a placeholder item, for when you know you want to index a certain term but don’t yet have the specific page number(s). It is processed like any other annotation, but you will get a warning in the error report if such an annotation is still present.
bears#99tbd
Overlapping ranges
Overlapping pages and page ranges will be combined. For example:
bears#15-20
bears#20-25
This will be interpreted as:
bears, 15-25
Similarly:
bears#20
bears#23
bears#20-25
Produces:
bears, 20-25
Annotated pages are an exception to this:
bears#23n1
bears#20-25
This will produce:
bears, 20-25,23n1
The “non-combining” annotation ‘@’ will not be shown in the formatted index but will prevent the page or range it is attached to from being combined with other pages.
Hemingway,Ernest>letters#56@,56-57@,57-59@
Adjacent but non-overlapping ranges will not be combined by default, but you can turn this on in the Settings dialog.
bears, 15-19,20-25,26
Sub-headings
To create a sub-heading, separate it from the main heading with a ‘>’ (greater-than) symbol.
bears>grizzly#34
...
bears>Kodiak#92-95
You can have up to three levels of headings.
bears>grizzly>geographic range#38
bears>grizzly>hibernation#40
Note: If the edit pane is not currently showing an autocomplete suggestion,
pressing the Tab key will insert a ‘>’ character.
“See” references
To create a “See” reference, use the “=” symbol:
bruins=bears
bears>teddy=Winnie the Pooh
This produces entries like:
bruins (see bears)
bears
teddy (see Winnie the Pooh)
“See also” references
To create a ‘See also” reference:
bears#25
bears+stock market
This will create an entry like:
bears, 25 (see also stock market)
“See (also) under” references
Similarly, you can create “See under” and “See also under” references.
Use ‘<’ (less-than) to indicate “See under”:
teddy bears<bears
Use ‘<<’ (two less-than symbols) to indicate “See also under”:
teddy bears<<stuffed animals
Formatting
You can add some basic formatting to headings.
Surround text with underscores “_” to italicize it:
_Setting Free the Bears_ (novel)#99
This will produce:
Setting Free the Bears (novel), 99
Surround text with asterisks “*” to bold it:
*The Bad News Bears* (film)#134
The Bad News Bears (film), 134
For bold-italic formatting, you can combine asterisks and underscores:
_*The Bad News Bears*_ (film)#134
For small caps, surround the text with ‘%’:
%CD-ROM%134
Similarly, you can apply bold and italic formatting to single-part or two-part page numbers or ranges to
denote pages with figures, tables, etc.:
bears#25,_26_
cats#*2-11*, 3-6
rodents#_*24*_,*_39_*
skunks#_iv_
Note that if you combine ‘_’ and ‘*’ formatting, you need to nest them properly.
You can add bold formatting to the current selection using the toolbar button (Ctrl+B; Edit > Bold); for italic, click (Ctrl+I; Edit > Italic); for small caps, click Ctrl+M or Edit > Small Caps. Ctrl+B, Ctrl+I, and Ctrl+M are also available in the New/Edit Item dialog.
Ignored input
A line starting with a number sign “#” will be ignored.
#Chicago Bears (sports team)<bears
This also lets you add comments in the input:
# check this in CMOS
In the edit pane you can toggle this on and off for the current item by pressing Ctrl+Q
Blank lines in the input will be ignored.
In the Settings > Export tab you can choose to include ignored items in the index.
To delete ignored and blank items, click Item > Delete Ignored/Blank Items (Ctrl+4).
Inherited headings
If you group similar entries together you can take advantage of a shortcut that can save some typing. A heading that is left blank will, if possible, be inherited from the previous item:
bears#25
>grizzly#38
In this example the missing main heading will be assumed to be “bears”, so these lines are equivalent to:
bears#25
bears>grizzly#38
The main heading is also inherited in this example:
bears>black#25
>grizzly#38
This is the same as:
bears>black#25
bears>grizzly#38
Sub-entries can also be inherited:
bears>grizzly#32
>>Canadian#37
Both the main heading (“bears”) and sub-heading (“bears”) are inherited in the second line.
You can continue the inheritance as long as you need to:
bears>grizzly#32
>brown#42
>>North American#43
>in the air#44
This is equivalent to:
bears>grizzly#32
bears>brown#42
bears>brown>North American#43
bears>in the air#44
It is an error if a heading is omitted that cannot be inferred from preceding content:
bears#35
>>Arctic
In this case the first sub-heading cannot be inferred in the second line.
headings or locators. You can work around this by using an abbreviation.
Custom subheading order
In the page settings dialog you can set the subheading order to alphabetical
(the default) or page number (also referred to as chronological) order. You can also force the sort order of specific subheadings.
Prefixing subheadings with the notation !n:, where n is a number, will force
the subheadings to follow the order you chose (the !n: will be stripped out in the formatted index).
Subheadings prefixed with $: will be forced to the bottom of the set of subheadings. You might use this feature if you wanted to display the list of works by an artist at the bottom of their entry. If more than one subheading is prefixed in this way, entries within the group will be alphabetized using
the normal rules.
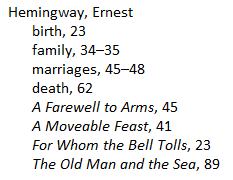
Hemingway, Ernest>!1:birth#23
Hemingway, Ernest>$:_A Moveable Feast_#41
Hemingway, Ernest>!2:family#34-35
Hemingway, Ernest>$:_A Farewell to Arms_#45
Hemingway, Ernest>$:_The Old Man and the Sea_#89
Hemingway, Ernest>!4:death#62
Hemingway, Ernest>$:_For Whom the Bell Tolls_#
Hemingway, Ernest>!3:marriages#45-48
These items will produce the following entry:
Right-to-left text
Including right-to-left flowing text such as Hebrew and Arabic requires special handling. Right-to-left text must be enclosed between two ‘@’ characters:
@جمال عبد الناصر حسين@56
Because typing right-to-left text in a left-to-right environment can be tricky, Picardy provides two keyboard shortcuts to facilitate this. Ctrl+F7 will paste the text in the clipboard into the edit pane or the current text entry field
and enter a comma after the first word, on the assumption that it is a surname. (This may not work for all names, particularly in Arabic.) The text will be enclosed in ‘@’ ... ‘@’. Ctrl+F8 will simply enclose the text in ‘@’ ... ‘@’ without further changes.
Validation and error checking
Items created from the New Item and Edit Item dialogs will follow the syntax described above. Items created by hand are subject to human error, and can be validated in several ways. Click Tools > Validate Index
(Ctrl+L) to check the whole index: this will detect “syntax” errors (wrongly-placed #, <, >, =, and + characters) and invalid page ranges, as well as consistency and style problems such as references that point to non-existing entries; circular references; entries with “See also” references but no page numbers or subentries; entries with “See” references but also page numbers or
subentries; and entries with both pages and subentries. Invalid items will be highlighted; if you hover the mouse pointer over the highlight you’ll see a short pop-up description of the error. You can cycle between the errors using (Tools > Next Mark or F3) and Tools > Previous Mark or F4).
Tools > Check Item (Ctrl+Shift+L) will validate the syntax and page numbers of the current item. You can turn on automatic syntax-checking as you type from the miscellaneous Settings dialog.
See also the error report (Tools > Error Report), which is generated every time you export or preview. (Exporting generates a more complete set of errors that includes consistency checks.) You can leave the Error Report dialog
on the screen and it will update as you enter new items in the edit pane.
If hyperlinks are being used as locators instead of page numbers, Validate Index will check whether the URLs are syntactically valid. This should be considered a screening tool only, and all hyperlinks should be tested to verify that they open the desired page. You can click links in the preview pane for this purpose.
Editing tools
Picardy provides a set of tools (most accessible from the Edit menu or via keyboard shortcuts) for manipulating index items.
Flip headings
Sometimes you may want to change the order of headings within an item. For example, you could change:
bears>Alaska#24
to
Alaska>bears#24
Put the cursor in one of the headings and click Item > Flip Headings (Ctrl+1).
If the item has three headings, the location of the cursor determines which headings are flipped:
- If the cursor is in the first or second heading, it will be flipped with the next-lower heading
- If the cursor is in the third heading, it will be flipped with the second
This function is also available in the Edit Item dialog, via the Ctrl+1 shortcut.
To create a copy of the current item with the headings flipped, click Item > Duplicate and Flip or press Ctrl+9.
Duplicating items
Click Item > Duplicate Item (Ctrl+2) to duplicate the current item.
Click Item > Duplicate Pages (Ctrl+7) to create a new item with blank headings and the page number(s) of the current item.
Double-posting
Double-posting means including two sets of index entries for terms that are synonyms or near-synonyms.
For example:
bears, 25, 34, 49
…
ursines, 25, 34, 49
Often this situation will be represented using a See reference:
bears, 25, 34, 49
…
ursines, See bears
However, especially in cases where there are no subheadings, you might want to convert the See to a double-post to make it quicker for readers to get to the information they want.
To do this, put the cursor in the item representing the See (that is, an item containing a “=”) and click Item > See to Double-post (Ctrl+3).
bears#25
bears#34,49
ursines=bears
Will become:
bears#25
bears#34,49
ursines#25
ursines#34,49
This function also applies to items with subheadings, though it is less usual to double-post such index entries.
Collapsing items
You may need to shorten index items that have subheadings, often in order to save space in the printed index. This can be done by collapsing the item so that only the main heading remains (as well as any page numbers
or references).
Put the cursor in the item and click Item > Collapse (Ctrl+5).
bears>grizzlies>Alaskan#27
will become:
bears#27
Item > Collapse All Like This will collapse all items that have the current main heading.
To join all the headings of an item into one, put the cursor in the item and
click Item > Join Headings (Ctrl+8).
Collapse and Join are also available in the Edit Item dialog
via Ctrl+5 and Ctrl+8, respectively.
Checking undifferentiated locators
It is normally considered bad indexing practice if a heading is followed by a long string of page numbers rather than having them broken out into subheadings. These are known as undifferentiated locators. In the
Configuration > Settings > Pages dialog you can specify a maximum
number of such locators. (A typical value would be six.) If you click Tools > Check Undifferentiated (F8), the preview pane will flag entries that exceed this number. (This does not prohibit you from using more locators if you choose to.)
Autocomplete
As you type in the edit pane, or New/Edit Item dialog, Picardy will attempt to autocomplete the current word, using words that you have already entered. To cycle through the available choices, press Esc; to accept the current suggestion, press Tab. You can turn autocomplete on or off
in the miscellaneous options dialog.
Scratchpad
The scratchpad (View > Scratchpad) enables you to add notes for yourself
concerning the current index, such as to-do lists, references consulted, emails from colleagues, and so forth. This information is viewed from within Picardy and is not exported with the index.
Capitalization
You can bulk-capitalize or uncapitalize main headings and references via
Item > Capitalize and Item > Uncapitalize.
Paste operations
Edit > Smart Paste (Ctrl+Shift+V) will paste the contents of the clipboard,
but first uncapitalize it, remove leading and trailing whitespace, remove punctuation at the end, and convert internal whitespace to a single space.
Clipboard > Pluralize (Ctrl+F6) will add a plural ending to the contents of the clipboard and paste the result.
Edit > Paste Formatted (Ctrl+Alt-V) will paste bold and italic text copied from
Microsoft Word or a web browser into the edit pane using Picardy’s formatting markup (Windows only).
See also Clipboard functions for special operations on the clipboard.
Statistics
Click Tools > Statistics to obtain the total number of entries, and the breakdown into main, sub-, and sub-sub-entries.
Highlights and marks
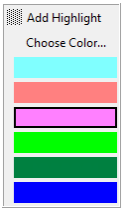
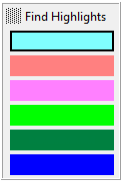
Highlights (also referred to as labels) enable you to mark parts of the input for later attention. Select the desired content and click (Tools > Add Highlight or F7) to select a highlight. Click Choose Color from the picker dialog; alternatively you can click from the list of already-used colors (if there are any). These highlights persist after you close the file.
Tip: To move the picker dialog, drag the square in the upper left corner. Use the Up and Down arrow keys to navigate the available options. Pressing Return/Enter is equivalent to clicking the highlighted option. Press Escape to dismiss the picker. It will open in the same position the next time it’s used.
You can search for highlights by selecting a currently-used color from the Tools > Find Highlights picker dialog.
To hide highlights without deleting them, click Tools > Hide Highlights. Click Show Highlights to display them again.
To delete a highlight, put the cursor in it and click Tools > Remove Highlight (Shift+F7). Click (Tools > Remove All Highlights) to delete all of the highlights.
Click (Tools > Remove Marks to remove marks for misspelled words,
invalid items, today’s items, and items highlighted via View in edit pane.
Highlight recent items
Click View > Highlight Items Created Today (Ctrl+Shift+Q) to highlight in the edit pane all new items from the current date. Execute the command again to hide the highlights. Similarly, click View > Highlight Items Modified Today (Ctrl+Shift+R) to highlight items created or modified today. You can scroll through the results of these commands using (Tools > Next Mark or F3) and (Tools > Previous Mark or F4).
Groups
Groups enable you to mark a set of items according to certain criteria, and then edit them separately and reintegrate the results back into the main index. For example, you can create a group containing all items that contain a spelling error, or all items that contain the text “Rome”. You can also select grouped items one-by-one manually. Most group functions are in the Groups menu.
Creating groups
There are several ways to create a group:
If you use Tools > Validate Index or Tools > Check Spelling,
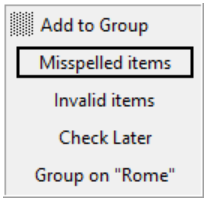
these commands will add marks to the edit pane to indicate errors (if there are any). To create a group containing the marked items, click Groups > Group on Marks. This will highlight the items and add them to a group called Misspelled Items or Invalid Items.When you create a group, its name is added to the Groups > Show/Hide Group sub-menu. You can define more than one group, and hide or display them one at a time as necessary. The active group name is
marked with a bullet character. (If you select the active group from the menu, it will become hidden and no groups will be displayed.)- If you select text in the edit pane, you can click Groups > Group on Selection to find all items containing the selected text and add them to a group. The group will be called, for example, Group on “Rome”.
- More generally, you can add the results of a text search to a group from the Find > Replace dialog. Click the Add to group checkbox, and then you can add matching items to a group one at a time, using Find Next, or all at once, using Find All.
- If the edit pane contains highlights, the Groups > Group on Highlights sub-menu will contain all the highlight colors that are currently in use. Click a color to create a group of all items containing that highlight. You will be prompted to manually choose a name for the group.
- You can group on a main heading and its subheadings (if there are any) by clicking Groups > Group on Heading; enter the heading text in the dialog and click OK. (By default, the dialog will display the main heading from the current item, if there is one.)
- You can create a group and add items to it manually. First, click Groups > New Group… and choose a name for the group. Then you can click Add Item to Group to display a picker dialog listing all groups; click the name of the group you want to add the current item to. To delete an item, click Groups > Delete Item from Group.
If you have created the Invalid items group, it will be updated automatically whenever you validate the index using Tools > Validate Index. Similarly, if Misspelled items is defined, it will be updated the next time you click Tools > Check Spelling. If you have created a group based on highlights of a particular color, it will be updated whenever you add or delete such a highlight. Groups created from a selection or heading will also be regenerated if you repeat the steps used to create them.
To delete a group, click Groups > Delete Group…
Editing groups
To edit the items in the active group, click Groups > Edit Group or press Ctrl+T.
The edit pane will change to contain only the group items.
You can edit items, add new items, save the group to a file, and export it.
When you are editing a group, the editing environment is restricted in certain ways:
- You can’t delete any lines, but you can delete a line’s contents
- Any new items and any pasted content containing a line break will be added at the end of the content
- You cannot open any other files
- Highlights are disabled
- Other group operations are disabled
- Configuration menu commands are disabled, except for Edit User Dictionary
When you have finished your changes, click Groups > Revert to Index (or press F12) to go back to the main index. Changed items will replace the original items. If an item is blank, instead of being deleted, the original contents will be prefixed with a ‘#’ to cause it to be ignored. New items will be added to the end of the index.
Find and Replace
Click (Edit > Find or Ctrl+F) to find and replace content in the edit pane, and
find content in the preview pane.
You can also create groups with Find and Find All by first clicking Add to group.
Note: Edit pane searches start at the current insertion cursor; preview pane searches start at the top of the index.
In addition to regular text searches, in the preview pane you can search for text within a specific heading. If you want to search for the main heading “bears”
and not match the word “bears” in any other context, you would enter > bears in the Find field. You can also search for specific subheadings; for example, you may have entries as follows:
predators
bears, 25
…
stuffed animals
bears, 67
To search for “bears” as a subheading of “predators” specifically, you would enter predators > bears in the Find field.
You can search using a few characters at the start of each heading instead of the full text: for example, pred > be would also match as described above. If a search matches more than one heading, all of them will be highlighted in the preview pane. Regular expressions are not available in this search.
If you dismiss the Find & Replace dialog after searching in the preview pane,
you can immediately press Ctrl+Shift+E to edit the heading that was matched, without having to hover the mouse pointer over it.
You can carry out searches using regular expression (sometimes called “patterns”) in both panes. This enables you to match a class of text strings instead of just the literal find text; for example, all headings starting with ‘the’ or ‘an’. If you’re not familiar with these
expressions, here’s a brief overview:
- A period matches any character. The expression
a.mwill match “arm”,
“aim”, and “alm” - An asterisk matches the preceding expression zero or more times.
ar*mwill match “am”, “arm”, and “arrrrm”. - A plus sign matches the preceding expression one or more times.
ar+mwill
“arm” and “arrrrm”, but not “am”. - A question mark matches the previous expression zero or one time.
ar?mwill match “am” and “arm”, but not “arrm”. - A circumflex (caret, hat) will match at the beginning of a line.
^catwill match “cat” at the beginning of a line but not “black cat”. Similarly, the “$” character will match at the end of a line.cat$will match “cat” at the end of a line but not “cattle”. - A set of characters inside square brackets will match any of the specified characters.
[ai]tmatches “at” and “it” - Two expressions separated by a vertical bar will match either expression.
in|of|bywill match any of “in”, “of”, and “by”. - You can surround an expression with parentheses for grouping.
(ar|bi|ca)twill match any of “art”, “bit”, and “cat”.
Note: The expressions above work in both Picardy panes. The edit pane also
supports a more extensive set of regular expressions, which you can learn about by doing a web search for “Python regular expressions”.
You can also take advantage of regular expressions in the replace text. This is done by means of group references. A group is an expression surrounded by parentheses in the find text. You can refer to the text that a group matches
using the notation \n where n is the group number, counting from left to right
in the find text.
If the find text is m(.)(.)(.)(.) there are four groups, each of which matches a single character (represented by a dot). You could have a replace expression \4\3\2\1 where each backslash followed by a number refers to a group. If the edit pane contains “media”, the find text will match it, and applying replace would change it to “aide”, by inserting each character matched by the groups in the order group 4, group 3, group 2, group 1 (in effect, reverse order).
Note: Regular expressions are similar, but not identical, to wildcards in Microsoft Word™. For example, the wildcard expression ‘h?t’ will match ‘hat’, ‘hot’,
‘hit’, etc., while the same regular expression will match ‘ht’ and ‘t’.
To achieve the same effect as the wildcard ‘h?t’, you would use the regular expression ‘h.t’.
Abbreviations
You can define abbreviations to make it easier to enter frequently used text such as names. For example, “ob” could represent “Obama, Barack”. To use the abbreviation in an index item, you would enter a dot followed by the abbreviation:
.ob>presidency#28-40
Abbreviations don’t need to be separated from surrounding text by spaces or other delimiters. If you have an abbreviation br for “bear” you can use it as follows:
.brs#25
.br behavior#26-29
This will produce:
bears, 25
bear behavior, 26-29
When the index is processed, abbreviations are applied in alphabetical order, with shorter abbreviations applied first. If you have abbreviations b for “bee” and br for “bear”, then .brs will be interpreted as “beers” since b is applied first.
To define abbreviations, click Configuration > Abbreviations.
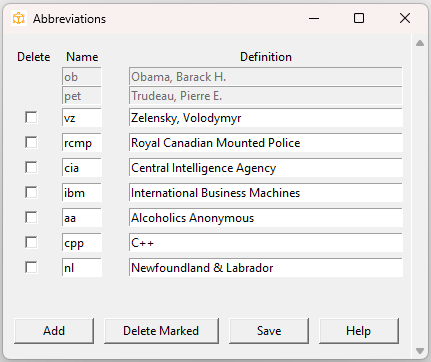
Picardy uses two sets of abbreviations, system and index-specific. If the current index is untitled, only the system abbreviations are available; these can be used for all indexes, and any changes you make will be saved to the system abbreviations. If the current index has a title, then you can also define, edit and use index-specific abbreviations; the system abbreviations cannot be edited in this case.
Click Add to define a new abbreviation. To delete an abbreviation, you can click the corresponding Delete checkbox and then click Delete Marked. Alternatively, any abbreviations that are marked for deletion or that have a blank name or definition will be deleted when you click Save.
You can use an abbreviation to work around the prohibition on the characters #><+=_* appearing in headings. For example, you could define an abbreviation cpp to represent the name of the programming language C++ and then create a item as follows:
programming languages>.cpp#29
If you don’t remember an abbreviation, you can right-click in the edit pane and click Insert Abbreviation from the pop-up menu to see a dialog box of available abbreviations.
Realphabetizations and sorting
You may want to override the default alphabetization of certain headings such as those that start with a number or special character. By default, all of these will be grouped before any headings that start with a letter—that is, before the A’s.
There are a number of realphabetizations that you can use.
To alphabetize numbers as if they were spelled out, click Alphabetize numbers as words in the Alphabetization tab of the Settings dialog.
This realphabetization may not always give you the result you want, however. The heading “24 Sussex Drive” will be grouped with the T’s as expected, but “1600 Pennsylvania Ave” will be grouped with the O’s (one thousand six hundred). If you want “1600” to be read as “sixteen hundred”, you can define a custom realphabetization.
Click Configuration > Realphabetizations:
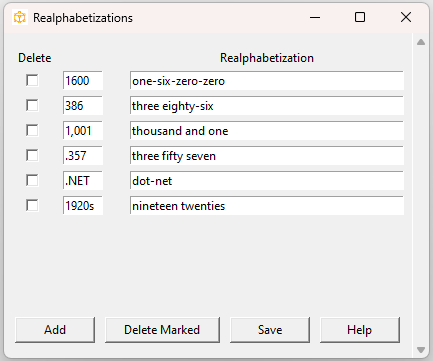
As with abbreviations, there are both system and index-specific realphabetizations. Adding and deleting realphabetization terms works the same as with abbreviations.
Note: Custom alphabetization must be turned on explicitly in the
Settings > Alphabetization tab.
Since realphabetizations are processed after abbreviations, you can also control the alphabetization of content expressed in an abbreviation, including text containing one or more of the #><+=_* characters. The realphabetization must be applied to the abbreviation definition, not the abbreviation itself. To continue the C++ example above, you could realphabetize C++ as cplusplus, which could produce the following ordering in the index:
cats, 33
C++, 19
Inline realphabetizations
You can insert one-time inline realphabetizations in the edit pane. To ignore characters in the alphabetization, enclose them in curly braces:
{Mr. }Rogers#34
This entry will be alphabetized with the R’s. To add braces around the current selection, press Ctrl+G or click Edit > Ignore in Sort.
You can enter text that will be used for alphabetization but not appear in the index by surrounding it with carets:
^Señor^{Mr. }Rogers#34
This entry will be alphabetized with the S’s but will appear as Mr. Rogers, 34.
To add carets around the current selection, press Ctrl+H or click Edit > Use in Sort and Hide.
Text in non-Latin scripts such as Cyrillic and Hebrew will be alphabetized according to a transliteration of their original characters into Latin script, as long as Alphabetize Unicode as ASCII is turned on. This may not always correspond to their normal English spelling. For example, יִשְׂרָאֵל
(Hebrew for “Israel”) will be alphabetized under ‘Y’. You can use an inline alphabetization to achieve the desired order.
^Israel^{@יִשְׂרָאֵל@}#45
(Note that the right-to-left text must also be enclosed between ‘@’ characters.)
Function words
Function words are prepositions and conjunctions (usually) that may be used in subheadings. For example:
bears
in cinema, 24-25
in literature, 26-27
for food, 26-27
as predators, 26-27
“in”, “for”, and “as” are all function words. Some indexing styles prefer these words to be ignored when the subheadings are alphabetized.
Picardy’s default configuration will ignore the following words:
in, of, for, with, after, and, by, as
If you want to alphabetize these words, click Configuration > Settings > Alphabetization and turn on Alphabetize function words.
You can add or delete function words by clicking Configuration > Function Words. As with abbreviations, there are both system and index-specific function words. Adding and deleting function words works the same as with abbreviations.
Spell-checking and dictionaries
Picardy provides spell-checking in Arabic, English, French, German,
Portuguese, Russian, and Spanish. Click or Tools > Check Spelling,
or press F2 to highlight misspellings. Click (Tools > Next Mark or F3) and
(Tools > Previous Mark or F4) and to cycle through the misspelled words.
You can delete the marks by clicking (Tools > Remove Marks).
Select the preferred language in the Configuration > Settings > Spell Checking dialog.
You can add words to the user dictionary for each language by clicking them in the edit pane and then clicking Add to Dictionary (Ctrl+D) in the pop-up menu. You can also view and edit the current user dictionary directly by clicking Configuration > Edit Dictionary. Words in this dictionary will apply to all indexes that use the chosen language.
Note: As befits free software, the dictionaries used by Picardy were created programmatically by volunteers who scanned a corpus of representative texts to create weighted word lists. As such, these dictionaries do not correspond specifically to any of the well-known commercial dictionaries. The English dictionary, in particular, contains both US and UK spellings.
Picardy user dictionaries are stored in the folder
C:\Users\username\AppData\Roaming\Picardy\Dictionaries.
If you need to move a Picardy project to another PC, you can copy the contents of this folder to the same location on the second computer.
If you have a lexicon of terms (with one term per line) for a particular project or language, you can save it to the file C:\Users\username\AppData\Roaming\Picardy\Dictionaries\picardy_en_supplementary.dict.
(For other languages, substitute the two-character language code (ar, de, es, fr, pt, ru) for ‘en’ in the file name.) You should save the file in UTF-8 format. These terms will be added to Picardy’s spell-checking.
Inserting and deleting pages
If the text that you have indexed has had pages inserted or deleted, you can indicate this and Picardy will adjust the existing page numbers accordingly. This feature applies to numeric, roman, and two-part page numbers.
Click Tools > Insert/Delete Pages:
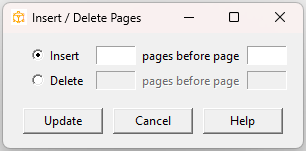
This lets you specify deleted or inserted pages relative to the following page. For example, to delete pages 6 and 7, you would indicate that two pages are to be deleted before page 8.
Tip: To delete one or more pages at the end of the text, the “before” page should be 1 greater than the last page in the text. For example, if the text has 400 pages and you want to delete pages 398-400, specify 3 pages before page 401 (even though page 401 doesn’t exist).
Clipboard functions
Picardy provides a set of small functions, similar to macros, that carry out some manipulations of the contents of the clipboard and paste the results in the edit pane (or in some cases, the New/Edit Item dialog).
The typical use for these functions is when you are copying some text from
another application (such as Adobe Acrobat) and want to paste it in the edit pane with a certain modification, such as switching the order
of a name. Therefore, the clipboard is often expected to contain one or more personal names or a title. You may be prompted to enter a page number
for the item or items that the function creates.
These functions are accessible in the Clipboard menu and/or via keyboard shortcuts.
Invert (Ctrl+F1) puts the last word (name) in the clipboard first, followed by
a comma and then the other names. For example, George Walker Bush will become:
Bush, George Walker#
Notice that the page number indicator, ‘#’, has been inserted after the name.
You could add a page number immediately or do it later.
Invert and Initialize (Ctrl+F2) also inverts the contents, but converts
all names except the last one to initials. The example above would become:
Bush, G. W.#
Invert and Initialize (no dots) (Ctrl+F3) does the same, but doesn’t insert
dots and runs the initials together:
Bush, GW#
Split at Commas (Ctrl+F4) processes a comma-separated list of names or phrases and creates a separate index item for each. The text London, New York, Toronto, Paris, and Tokyo will become:
London#
New York#
Toronto#
Paris#
Tokyo#
Split at Commas and Invert (Ctrl+F5) processes a comma-separated list of names, inverts them, and creates a separate index item for each. The text Bill Clinton, Pierre Trudeau, Ronald Reagan, Jean Chrétien, and Barack Obama
will become:
Clinton, Bill#
Trudeau, Pierre#
Reagan, Ronald#
Chrétien, Jean#
Obama, Barack#
Surround with Double Quotes (Ctrl+”) surrounds the clipboard contents with double quotes
Surround with Single Quotes (Ctrl+’) surrounds the clipboard contents with single quotes
Italicize (Ctrl+Shift+I) italicizes the clipboard contents
_The Birds_#
Embolden (Ctrl+Shift+B) bolds the clipboard contents
*animals*#
The following are available from the keyboard only:
Split at Commas and Ask Page (Ctrl+F9) is similar to Split at Commas but it also shows a dialog asking for an (optional) page number. If you supply one, it will be added to each of the index items:
London#72
New York#72
Toronto#72
Paris#72
Tokyo#72
Split at Commas, Invert, and Ask Page (Ctrl+F10) is similar to
Split at Commas and Invert but asks for a page number.
Clinton, Bill#88
Trudeau, Pierre#88
Reagan, Ronald#88
Chrétien, Jean#88
Obama, Barack#88
Styles
You can change the formatting of the edit and preview panes. These styles do not affect the format of export files.
Click (Configuration > Styles):
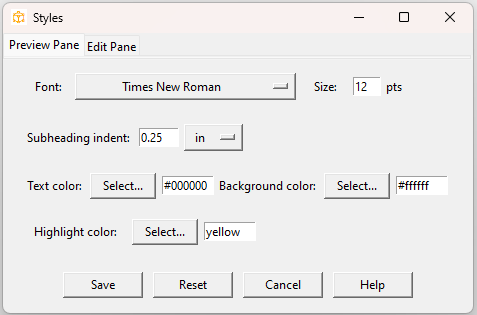
For the preview pane you can set the font and font size; the subheading indent; the text (foreground) and background colors; and the highlight color for the current entry.
For the edit pane you can set the font and font size; the text and background colors; and the highlight color for the current item. You can also turn
separator (syntax) coloring on or off and select the separator color.
Reset will revert the settings to their last saved values. The edit and preview
panes will be updated when you click Save.
Sorting the edit pane
To view the contents of the edit pane in sorted, alphabetical order, click View > Sort Edit Pane. This displays the items in a restricted editing environment that is similar to the one used when editing groups:
- You can’t delete any lines, but you can delete a line’s contents
- Any new items and any pasted content containing a line break will be added at the end of the content
- You cannot open any other files
- Highlights are disabled
- Group operations are disabled
Any items that use the shorthand notation for inherited headings will have the missing headings filled in.
When you have finished viewing or editing, click View > Revert Edit Pane to
go back to the original ordering. You can also save the ordered version, which will overwrite the original.
Backups
Picardy will back up the current index every 60 minutes by default (you can change this interval or disable backups in the miscellaneous settings dialog; you can also change the backup folder). If you open a file and Picardy detects
a backup that has been saved more recently, you will be offered the option of opening the backup instead. The backup will adopt the same settings as the original file, and the original will be untouched—you can open it again at any time. You may also choose to work with the backup and later resave it using the original file name.
To open the backups folder, showing backups of the current index, click File > Backups > Go To Backups (Ctrl+Shift+O). To delete all backups or just backups for the current index, click Delete All Backups or Delete Backups for This Index in the same submenu.
Picardy settings
There are a number of settings to configure the output and input.
Click (Configuration > Settings):
Picardy maintains system and index-specific settings. System settings will apply if the current index is untitled; any settings that you make in this case will be saved to the system settings.
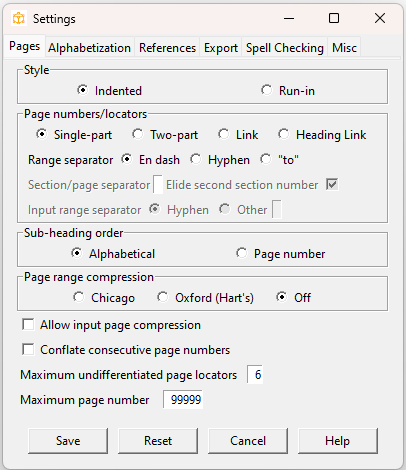
Page settings
Here you can choose the overall style of the index—indented
or run-in. An indented index has each heading level on a separate line and indented. In a run-in index, sub-headings are on the same line as the main heading. This format saves space, but some people find it harder to read. Usually run-in indexes have only two levels of headings; if you choose a run-in index and there are three levels in the input, then the second-level headings will be indented, but only for sub-entries of the corresponding main heading.
Page numbers can be single-part (1, 12, 23) or two-part (1-1, 2.12, B-23, A9). For both single-part and two-part page numbers, you can choose an en-dash, hyphen, or the word to as the range separator (to is normally used for two-part numbers.)
For two-part numbers, choose the separator between the section and page number. Section numbers can be digits or uppercase letters. To use two-part page numbers without a separator (for example, A1, C3-C9, and so forth) leave the separator blank. In this case, the section part of the number must be an uppercase letter.
You can elide the second section number in a range on output, so that,
for example, 1.3-1.10 would be formatted as 1.3-10 (you still have to include both section numbers in the input).
Note: For two-part page numbers that have an explicit section/page separator, use a slash as the input range separator (2-1/2-7, for example). All other numbers use a hyphen as the input range separator.
Instead of page numbers, you can enter links (hyperlinks, URLs), which will be displayed after the headings just as page numbers are. Alternatively, you can display the index with linked headings, which can be clicked to access the specified web page. Both of these options are available in HTML and RTF indexes.
Typical sub-heading order is alphabetical, but you can change it to page number order or use a custom ordering. Page number order is not that common, but might be used if the subheadings occur in chronological order. See also the section on custom subheading order.
Compression refers to shortening page number ranges in the output, usually to save space. For example, 23-8 instead of 23-28. By default page numbers will be output in full, but you can choose Chicago Manual or
Oxford Guide (also known as Hart’s rules) compression instead.
You can also compress the page ranges in your input. The compression style is “modified Oxford” whereby any digits omitted in the endpoint of the range will simply be replaced by the corresponding digits in the starting point. So, for example, 9871-5 will be interpreted as 9871-9875; 9871-89 will be interpreted as 9871-9889.
Note: Input and output page compression is available for single-part numbers only.
You can choose to conflate consecutive page numbers on output, so that, for example 23,24,25 will become 23–25. This works for two-part numbers as well, but only numbers within the same section will be conflated.
You can set the maximum number of undifferentiated locators. (A typical value would be six.) If you click Tools > Check Undifferentiated, the preview pane will flag entries that exceed this number.
If you specify a maximum page number, the error report (Tools > Error Report) will flag instances of page numbers that exceed that limit. This provides a sanity check for invalid page numbers.
Note: To set the separator between headings and page numbers—by default a comma—see the section on export settings.
Alphabetization settings
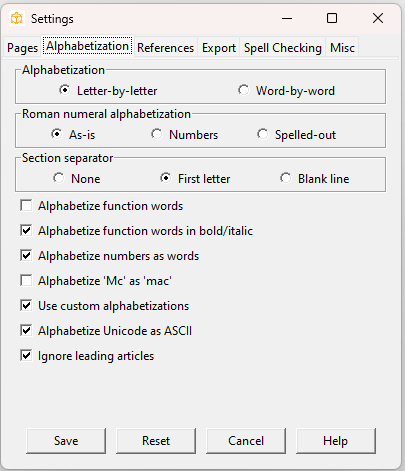
By default headings are alphabetized letter-by-letter, but you can change this to word-by-word. The differences between these are subtle and most of the time you might not notice any change. If you are working for a client, check which they prefer.
You can choose to alphabetize roman numerals as-is (“XX Century” will be alphabetized with the X’s), as decimal numbers (“XX” is treated as “20” and will come before any alphabetic headings), or spelled out (“XX” is treated as “twenty” and alphabetized with the T’s).
You can add a separator before each alphabetic section (A’s, B’s, C’s, …). This can be the initial letter or a blank line.
Function words in subheadings will be ignored in alphabetization; click Alphabetize function words to change this. As an exception to this rule, you can choose to alphabetize those in emphasized text (text that is marked up in italic and/or bold), so that, for example, function words at the beginning of book titles will be alphabetized.
Alphabetize numbers as words will cause numbers to be alphabetized as if they were written out in English. For example, “24 Sussex Drive” would be alphabetized with the T’s.
Names starting with Mc can be alphabetized as if they start with Mac (so McAndrew would precede macaroni, for example).
Custom alphabetizations override the defaults and may be useful for
headings starting with numbers or other non-alphabetic characters. See the section Realphabetizations above for more information.
Alphabetizing Unicode characters as ASCII will cause words with “accented” characters to be treated as their a-z equivalents, so “François” will be ordered like “Francois” and will come before “Frank”. Additionally, words written in other scripts (such as Cyrillic) will be processed in their Latinized form.
Leading articles (a, an, the) will by default be ignored in alphabetization.
Reference settings
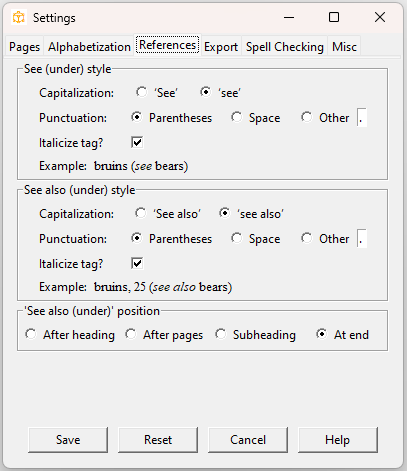
References are phrases (locators) in the index beginning with See, See also,
See under, and See also under. These references can be formatted in a number of ways, for example:
bruins (see bears)
bruins. See bears
bruins, see bears
In the References tab you can control the capitalization (“See” versus “see”),
the type of punctuation used to separate the reference from adjacent content, and whether the keyword is italicized.
See also and See also under references can be placed directly after the heading, after the page numbers, as the first subheading, or at the end of the subheadings (if there are any).
Export settings

You can export the index in seven formats: plain text, HTML, RTF, plain RTF, Cindex™ IXML, SKY Index™ 8.0 (.txtsky8), and EPUB.
Plain RTF is an RTF file in which no styles have been applied.
For styled RTF files, Picardy assigns style tags to the different levels, namely Separator, Entry, SubEntry, and SubSubEntry. If your client requests different style tags, they can easily be changed in the RTF file; if you are unfamiliar with style tags, search the Microsoft support website for “Customize Word styles”.
By default, headings are separated from the page numbers or references by a comma, but you can change this to a tab, space, or leader dots.
Note: In some cases, such as in run-in indexes, tabs and leader dots don’t make typographical sense and will default to a comma.
In plain text and plain RTF, you can substitute four spaces for a tab. These formats can also be double-spaced.
If your page locators consist of links, you can choose to format these as bullet
characters in HTML output.
You can choose to include ignored items (those starting with a ‘#’ in the exported output).
Spell-checking settings
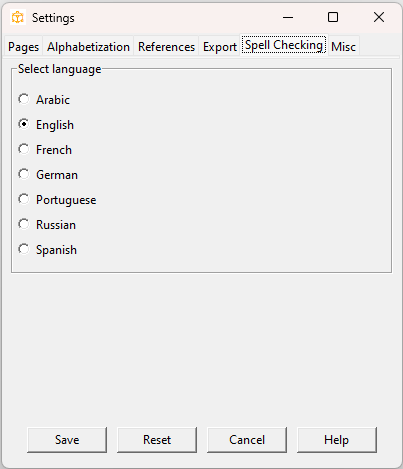
Choose the language for spell-checking.
Miscellaneous settings
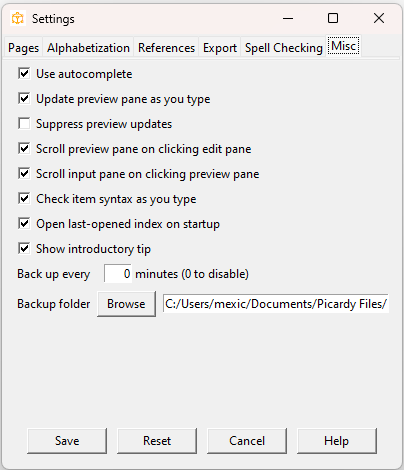
Autocomplete in the edit pane and New Item dialog is turned on by default, but if you prefer not to use it you can turn it off here.
The preview pane will be updated automatically when you carry out certain actions, such as adding or deleting an item. You can also configure it to be updated continuously as you type, and jump to the item you’re currently editing.
You can also configure the preview pane to scroll to the current entry when you click in the edit pane. Similarly, you can configure the edit pane to scroll to the current item when you click the preview pane.
Alternatively, you can suppress all automatic updates of the preview pane.
(You will still be able to update it explicitly from the menu, keyboard shortcut, or toolbar.) This may speed up typing in very large indexes, and keep the preview static if you are editing from the preview pane in page-number order.
If you turn on syntax-checking, the item you’re currently typing will be highlighted in red if you make an error, such as entering two ‘#’ characters in the same item, or a page number such as 32-ii. When you press
Enter at the end of an item, Picardy will also check for invalid page ranges such as 45-41.
By default the last index that you opened in the previous session will be opened on startup. If you want to start with a blank editing pane you can turn off this feature.
You can turn off the introductory tooltip that is shown when the edit pane is empty.
You can select the backup interval, or turn off backups by entering an interval of zero. You can also choose a different backup folder.
Appendix A: Importing a PDF index into Picardy
If you have an existing index in PDF format, you can convert it to Picardy format using a number of find-and-replace operations in Microsoft Word™.
(Thank you to Michael Wyatt for devising and compiling this procedure.)
Note: In these instructions, the symbol ␣ represents a space.
- Open the index in Acrobat.
- Open a new document in MS Word. We recommend that you save the Word file after each
replacement step below. - Select the index text, if necessary page by page or column by column, press Ctrl+C to copy it, and paste it into
Word (Ctrl+V). - Visually scan the Word document for turnover lines within entries and remove extra
hard returns. - Determine whether styles have been assigned to different levels of the index:
Select View, Draft and inspect the styles column on the left: Have main headings been assigned
one style and subheadings another?- Click on a main heading and note the style
- Click on a subheading and note the style
- If the main headings and subheadings have been assigned separate styles, make a note of the subheading style
- If the main headings and subheadings all have the same style, go to step 8 below
- Quickly check that pasting has retained the correct style in every case, especially at the end of columns. If necessary apply the correct style: use the Apply Styles dialog (press Ctrl+Shift+S)
- Insert a Picardy subheading separator,
>, before each subheading:- Open Find and Replace: press Ctrl+H
- Find what:
?*^13 - Replace with:
>^& - Click More and check Use wildcards
- Click Format, Style
- Select the style assigned to subheadings and click OK
- Click Replace All
- If there are many headings ending in parentheses, perform another search: Find
([)]) - Place the cursor in the Find box and click No Formatting
- Go to step 9 below
- If main headings and subheadings all have the same style:
- Open Find and Replace: press Ctrl+H
- Find what:
^p
Replace with:^p> - If there are more mains than subs, then:
Find Next: If next line is main, press F; If next line is sub, press R - If there are more subs than mains, then:
Click Replace All
Manually delete the > character before each main
- Insert a Picardy page number separator,
#, before the first locator:- If the first locator is preceded by a space without a comma, then Find what:
([A-z])␣([1-9]) - If the first locator is preceded by a comma and space, then Find what:
([A-z]),␣([1-9]) - Replace with:
\1#\2 - Check Use Wildcards
- Click Replace All
- If there are many headings ending in parentheses, perform another search for
([)]␣([1-9]) or ([)]),␣([1-9])as appropriate
- If the first locator is preceded by a space without a comma, then Find what:
- Scan for cross-references:
- Copy “See also” from the index including punctuation and spaces into the Find what box
- Replace with: +
- Click Replace All
- If references are enclosed in parentheses:
Find what:\(See␣(*)\)
Replace with:=\1
Check Use Wildcards - Otherwise, copy “See” from the index including punctuation and spaces into the Find
what box
Replace with:= - Click Replace All
- Convert headings with no locators:
- Find:
([A-z])^13\> - Replace with
\1> - Check Use Wildcards
- Click Replace All
- Find:
- If page ranges contain en rules, find and replace with hyphens:
- Find what: Press and hold the Ctrl key and press the dash on the numeric keyboard
- Replace with:
-(hyphen) - Click Replace All (Note: if there are any en rules used in headings, change them back)
- If there are any italics or bold characters (apart from cross-references):
Change formatting of italics
- Find what: [Leave blank]
- Format, Font, Font style: Italic
- Replace with:
_^&_ - Format, Font, Font style: Regular
- Uncheck Use wildcards
- Click Replace
- When finished, place the cursor in the Find what and Replace with boxes in turn and
click No formatting
Change formatting of bold
- Find what: [Leave blank]
- Format, Font, Font style: Bold
- Replace with:
*^&* - Format, Font, Font style: Regular
- Uncheck Use wildcards
- Click Replace All
- When finished, place the cursor in the Find what and Replace with boxes in turn and
click No formatting
- Check whether leading spaces between italic text and roman page numbers was italicized:
- Find what:
#_ - Replace with:
_# - Uncheck Use wildcards
- Click Find Next: Go through manually, clicking Replace only when italic text is followed by a roman number, avoiding roman text followed by an italic number
- Find what:
- Select the entire index and copy it: Ctrl+A, Ctrl+C
- Open Picardy and start a new index (press Ctrl+N if the edit pane is not blank already).
- Paste the index into the edit pane: Place the cursor in the edit pane and press Ctrl+V.
- Check for errors:
- Check for syntax errors: Press Ctrl+L to validate, and then hover over each highlighted
item to view the error type - Scan visually and make any necessary corrections.
- Check that quote marks and other special characters have imported correctly
- Check for syntax errors: Press Ctrl+L to validate, and then hover over each highlighted
Index
- abbreviations •
- accelerators, keyboard •
- AI •
- alphabetization •
- settings •
- annotations ••
- non-combining •
- Arabic text •
- articles, leading •
- autocomplete • •
- autosave •
- background color •
- backups • •
- best practices •
- Bing •
- bold text • •
- browser, opening in • •
- capitalization •
- character formatting • •
- character map •
- ChatGPT •
- Check Item •
- Cindex
- clipboard functions • •
- CMS (Chicago) compression •
- collapsing items •
- comma separator •
- comments •
- compression, page range •
- configurations •
- converting case •
- customized order • •
- Cyrillic text •
- deleting pages •
- dictionaries •
- double-posting •
- double-quotes •
- duplicating items •
- edit pane •
- entries, defined •
- EPUB output • •
- error-checking •
- error report •
- exporting •
- filtering •
- find and replace •
- grouping on results •
- flipping headings •
- fonts •
- force sort • •
- formatting •
- function words •
- in sorting •
- groups •
- Hart’s rules compression •
- Hebrew text •
- hexadecimal characters • •
- highlight color •
- highlights •
- grouping on •
- HTML output • •
- hyperlinks, as locators • • •
- ignored items • •
- Ignore in Sort •
- importing •
- indented style •
- indexing guidelines •
- inherited headings •
- initializing names •
- inline realphabetization •
- input compression •
- input format •
- inserting pages •
- inverting names •
- italic text • •
- item, defined •
- IXML • •
- joining headings •
- jumping between panes • •
- keyboard shortcuts •
- labels •
- language support • • •
- leader dots, in exported files •
- leading articles •
- letter-by-letter alphabetization •
- links, as locators • • •
- locators •
- lowercase headings •
- marks •
- maximum page number •
- “Mc” alphabetization •
- menu item availability •
- merging •
- notes •
- numbers, alphabetization •
- options •
- overlapping page ranges •
- Oxford compression •
- page number order •
- page numbers •
- settings •
- page range compression •
- page ranges • •
- partial indexes •
- paste operations •
- pasting •
- patterns, in find text •
- PDF import •
- .pdy files •
- .pdyt files •
- Picardy, name explained •
- plain text
- pluralizing •
- preview pane
- propagating changes • •
- Python language • •
- realphabetization •
- recent items •
- references •
- regular expressions •
- renumbering pages •
- resizing panes •
- right-to-left text • •
- roman numerals •
- alphabetization •
- RTF output • •
- run-in style •
- sample file •
- saving •
- Scratchpad •
- script support •
- searching •
- “see also” references • • •
- “see also under” references • • •
- “see” references • • •
- “see under” references • • •
- settings •
- shortcuts, keyboard •
- single-quotes •
- SKY Index
- small caps •
- sort edit pane •
- sorting •
- special characters •
- spell-checking ••
- grouping on results •
- splitting pasted text •
- startup file •
- statistics •
- styles, formatting •
- styles, index •
- subheadings ••
- symbols •
- syntax •
- tabs, in exported files •
- templates •
- text color •
- tooltip •
- undifferentiated locators • •
- undo •
- Unicode •
- uppercase headings •
- URLs, as locators • • •
- user dictionaries •
- validation •
- grouping on results •
- wildcards •
- word-by-word alphabetization •
- Word/RTF styles •
—Updated: April 25, 2024.
Copyright © 2022-2024 Rodney Boyd